Restoration
Noun: res·to·ra·tion \ˌres-tə-ˈrā-shən\
The act or process of returning something to its original condition by repairing it, cleaning it, polishing it and then loving it.
Every collector has their own method of madness for restoring old and rusty Kerosene oil Heaters. Information and suggestions on this page have been gathered from other more experienced folks and my own methods, which I’ve learned through trial and error. As you become more experienced with restoring, you’ll figure out all those little tricks on your own. What works for me may not necessarily work for you, as each Heater is very different and can react in a negative manner to certain chemicals or cleaning processes that you use.
A good example is when Aluminum and Zinc are mixed with Citric Acid – DON’T DO IT! EXERCISE CAUTION WHEN USING CHEMICALS AND POWER TOOLS!
METHODS FOR REMOVING RUST FROM YOUR HEATER
1. THE VINEGAR METHOD
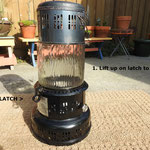
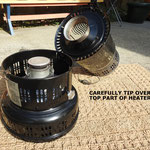
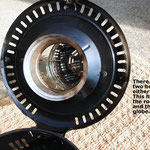
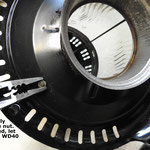
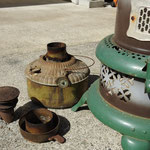
Carefully take apart your heater. This involves removing the two tall rods that you see inside the globe. These two rods connect the top piece to the bottom of the heater. You may have to use WD40/PB Blaster on the old bolts in order to loosen them up.
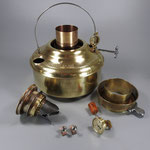
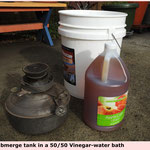
Remove the fuel tank. Remove the flame spread, gallery, and wick if one is present. The fuel tank and all components will need to be thoroughly washed and most likely submerged in the Vinegar-water bin. You may also need to use Oven Cleaner on the Flame Spreader and Gallery. Old Kerosene is difficult to remove at times.
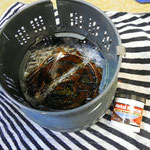
Mix a 50/50 mix of Apple Cider Vinegar and water. You’ll need a large bin, laundry tub, rubber garbage barrel in order to soak the entire heater. Something smaller can be used if your model has the glass globe as once the globe is removed you are dealing with just two smaller sections; the top piece and the bottom. Do check on progress often to make sure nothing is being damaged with the heater.
ALTERNATIVE: I used Workshop Hero Metal Rescue. Works quickly and efficiently, yet it is more costly than Vinegar.
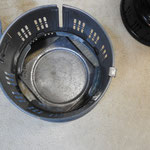
Depending on how much rust you are dealing with, this may take some time to remove the rust. When you are satisfied with the results, remove the parts and hose off any remaining residue.
Scrub with a steel wool and if necessary use a wire wheel on it for deeper rust. *USE CAUTION WITH THE WIRE BRUSH/WHEEL. IF YOU ARE NOT REPAINTING, THIS DOES NOT APPLY!
If your Perfection Heater is Enamel and does not need any rust removal, only wash with a towel and some dish soap. Thoroughly dry. That’s it! If there is major rust present, you can soak the heater in the 50/50 Apple cider-Water bath, but monitor it closely. If the enamel is in very poor condition, you will have to make a decision to have it enameled again (very expensive) or leave as is.
2. HOW DO I REMOVE THAT HORRIBLE PAINT THAT SOMEONE USED?
This can be extremely difficult at times. In the process of rust removal, hopefully some of the old paint will come off when you hose off the parts. This is also where the wire brush comes in handy. I personally use Mr. Muscle Oven cleaner for stripping off paint. Not only on heaters, but on my vintage kerosene lanterns. I find it works far better than paint stripper and it is much more affordable. You may find yourself doing this a few times in order to get all the paint off.
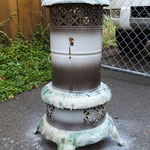
3. LET’S PAINT!!
Make sure all of your parts are clean and dry. Wipe all surfaces with alcohol to make sure there is no dust present.
Prime the entire heater with high heat primer – Dupli- Color Ceramic Primer is
well recommended by those who have repainted a Perfection Heater.
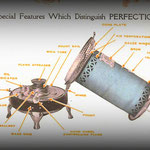
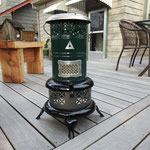
Dupli-color high heat paints seems to be the weapon of choice for repainting Perfection heaters. If done correctly, the results can be stunning. The specific Dupli-Color paint is ‘DUPLI-COLOR CERAMIC ENGINE 500F HIGH TEMP PAINT’. This is carried at various auto supply stores. CHECK OUT THE IMAGES FROM THE PERFECTION CATALOGS AND ALSO THE VARIOUS MODELS. YOU SHOULD BE INSPIRED WITH THE COLORS.
You want to do 3 coats within approximately one hours’ time. Use thin coats as you go along. Spray, dry just a bit and go again. The recoating instructions are on the can of Dupli-Color.
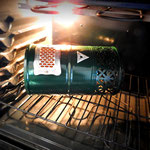
Now, here is the very special part that you need to pay attention to. CURING TIME!!! I’ve used the Easy Bake Method (yes, you are going to bake the parts in your oven so it cures correctly). HERE ARE THE STEPS:
Start with 1/2 hour at 220 °F.
Then another 1/2 hour at 275 °F
Finally 1 to 2 hours at 320 °F to 350 °F.
You can vary the temperatures, but do not have it super-hot in the beginning stage.
Now, wait a few days and then reassemble the heater. Next you do the burn process:
1. Light up the heater for 30 minutes or so
2. Cool down completely
3. REPEAT 3 MORE TIMES!!
4. Do this outside – there will be some fumes at first but eventually they dissipate.
HOW ABOUT BUILDING AN E-TANK?
This is the other method used called 'Electrolysis' which involves a 12 volt battery, some water and caution. I have not used it, but if you are interested, I would suggest you visit 'You Tube' as there are many videos demonstrating that method. There is also a the Electrolysis Facebook group which has a wealth of information and photos. https://www.facebook.com/groups/ElectrolysisTanks/

BELOW ARE THE STEPS FOR DISASSEMBLING THE HEATER AND HOW TO REMOVE THE TWO STEEL RODS THAT HOLD THE GLASS GLOBE IN PLACE.
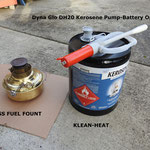
I'VE ALSO SHOWN HOW I FILL MY FUEL TANKS WITH A TRANSFER PUMP. THIS WORKS EXTREMELY WELL WITH NO SPILLING OF THE KEROSENE.
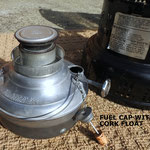
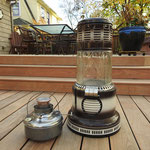
NOTE THE TWO DIFFERENT STYLES OF FUEL GAUGES. ONE IS A CORK FLOAT WITH A PIN AND THE OTHER IS A BRASS FUEL GAUGE WITH A NEEDLE ON TOP OF THE FUEL CAP. THERE IS ALSO A CORK ATTACHED TO THIS STYLE.